前言
在前面已经介绍过了SSO单点登录的一些理论知识:登录那些事(一):用简单的话来讲讲SSO单点登录。今天我们就通过一个demo来实现下这个CAS系统。
准备工作
建表
1
2
3
4
5
6
7
8
9
| CREATE TABLE `users` (
`id` int NOT NULL AUTO_INCREMENT,
`username` varchar(255) COLLATE utf8mb4_general_ci NOT NULL,
`password` varchar(255) COLLATE utf8mb4_general_ci DEFAULT NULL,
PRIMARY KEY (`id`)
) ENGINE=InnoDB AUTO_INCREMENT=2 DEFAULT CHARSET=utf8mb4 COLLATE=utf8mb4_general_ci;
# 插入一条默认数据
INSERT INTO `cas`.`users`(`id`, `username`, `password`) VALUES (1, 'happyjava', '123456');
|
搭建cas工程
通过Spring initial快速创建一个SpringBoot工程,额外依赖如下:Lombok、MySQL、Mybatis、MybatisPlus、freemarker模板引擎。
1
2
3
4
5
6
7
8
9
10
11
12
13
14
15
16
17
18
19
20
21
22
23
24
25
26
27
28
29
30
31
32
33
34
35
36
37
38
39
40
41
42
| <dependencies>
<dependency>
<groupId>org.springframework.boot</groupId>
<artifactId>spring-boot-starter-web</artifactId>
</dependency>
<dependency>
<groupId>org.mybatis.spring.boot</groupId>
<artifactId>mybatis-spring-boot-starter</artifactId>
<version>2.1.2</version>
</dependency>
<dependency>
<groupId>mysql</groupId>
<artifactId>mysql-connector-java</artifactId>
<scope>runtime</scope>
</dependency>
<dependency>
<groupId>org.projectlombok</groupId>
<artifactId>lombok</artifactId>
<optional>true</optional>
</dependency>
<dependency>
<groupId>org.springframework.boot</groupId>
<artifactId>spring-boot-starter-test</artifactId>
<scope>test</scope>
<exclusions>
<exclusion>
<groupId>org.junit.vintage</groupId>
<artifactId>junit-vintage-engine</artifactId>
</exclusion>
</exclusions>
</dependency>
<dependency>
<groupId>com.baomidou</groupId>
<artifactId>mybatis-plus-boot-starter</artifactId>
<version>3.3.1.tmp</version>
</dependency>
<dependency>
<groupId>org.springframework.boot</groupId>
<artifactId>spring-boot-starter-freemarker</artifactId>
</dependency>
</dependencies>
|
application.propertiees
1
2
3
4
5
6
7
8
9
10
11
12
13
14
15
| spring.datasource.url=jdbc:mysql://localhost:3306/cas?useUnicode=true&characterEncoding=utf8&serverTimezone=Asia/Shanghai
spring.datasource.username=root
spring.datasource.password=123456
spring.datasource.driver-class-name=com.mysql.cj.jdbc.Driver
spring.freemarker.allow-request-override=false
spring.freemarker.cache=true
spring.freemarker.check-template-location=true
spring.freemarker.charset=UTF-8
spring.freemarker.content-type=text/html
spring.freemarker.expose-request-attributes=false
spring.freemarker.expose-session-attributes=false
spring.freemarker.expose-spring-macro-helpers=false
spring.freemarker.suffix=.ftl
spring.freemarker.template-loader-path=classpath:/templates/
|
搭建demo工程
简单的一个SpringBoot项目。
CAS系统需要提供如下接口
- 首页请求,如果未登录重定向到登录页面,如果已经登录了,则生成st重定向回业务系统。
1
| /?site=http://server.com:8081
|
- 登录接口,接受用户输入账号密码的登录请求,登录成功后把用户重定向会业务系统。
1
| POST /login?username=xxx&password=xxx&site=http://server.com:8081
|
- 校验st接口,提供给业务系统调用校验st是否合法,返回用户信息。
示例代码如下:(随手demo,只为实现基本功能)
IndexController.java
1
2
3
4
5
6
7
8
9
10
11
12
13
14
15
16
17
18
19
20
21
22
23
24
25
26
27
28
29
30
31
32
33
34
35
36
37
38
39
40
41
42
43
44
45
46
47
48
49
50
51
52
53
54
55
56
57
58
59
60
61
62
63
64
65
66
67
68
69
70
71
72
73
74
75
76
77
78
79
80
81
82
83
84
85
86
87
88
| @Controller
public class IndexController {
private static final Map<String, Integer> ST_MAP = new ConcurrentHashMap<>();
private final UsersMapper usersMapper;
public IndexController(UsersMapper usersMapper) {
this.usersMapper = usersMapper;
}
@RequestMapping(value = {"/"})
public String index(HttpServletRequest request, HttpSession session) {
String site = request.getParameter("site");
if (site == null) {
site = "";
}
Integer userId = (Integer) session.getAttribute("userId");
if (userId != null) {
String token = UUID.randomUUID().toString();
ST_MAP.put(token, userId);
if ("".equals(site)) {
User user = usersMapper.selectById(userId);
request.setAttribute("username", user.getUsername());
return "index";
} else {
return "redirect:" + site + "/login?st=" + token;
}
} else {
request.setAttribute("site", site);
return "login";
}
}
@PostMapping(value = " ")
public String login(String username, String password, String site,
HttpServletRequest request, HttpSession session) {
if (username == null || password == null) {
throw new IllegalArgumentException();
}
List<User> users = usersMapper.selectByMap(new HashMap<>() {{
put("username", username);
put("password", password);
}});
if (users == null || users.size() == 0) {
return "passworderror";
}
User user = users.get(0);
session.setAttribute("userId", user.getId());
String st = UUID.randomUUID().toString();
ST_MAP.put(st, user.getId());
if (site == null || site.equals("")) {
request.setAttribute("username", user.getUsername());
return "redirect:/";
} else {
return String.format("redirect:%s/login?st=%s", site, st);
}
}
@PostMapping(value = "/auth")
@ResponseBody
public Object auth(String st) {
if (st == null || "".equals(st)) {
throw new IllegalArgumentException();
}
Integer userId = ST_MAP.get(st);
if (userId == null) {
return new HashMap<String, Object>() {{
put("result", false);
put("errorMsg", "st异常");
}};
}
User user = usersMapper.selectById(userId);
ST_MAP.remove(st);
return new HashMap<String, Object>() {{
put("result", true);
put("userId", userId);
put("username", user.getUsername());
}};
}
}
|
页面的代码比较简单,可以查看demo即可。
DEMO业务项目需要提供如下功能
示例代码如下:(随手demo,只为实现基本功能)
IndexController.java
1
2
3
4
5
6
7
8
9
10
11
12
13
14
15
16
17
18
19
20
21
22
23
24
25
26
27
28
29
30
31
32
33
34
35
36
37
38
| @Controller
public class IndexController {
private final static String CAS_URL = "http://cas.com:8080";
@Value("${localServerUrl}")
private String localServerUrl;
@GetMapping(value = "/")
public String index(HttpServletRequest request, HttpSession session) {
String username = (String) session.getAttribute("username");
if (username == null || "".equals(username)) {
return String.format("redirect:%s/?site=%s", CAS_URL, localServerUrl);
}
request.setAttribute("username", username);
return "index";
}
@GetMapping(value = "/login")
public String login(String st, HttpServletRequest request) throws JsonProcessingException {
if (st == null || "".equals(st)) {
throw new IllegalArgumentException();
}
RestTemplate restTemplate = new RestTemplate();
String s = restTemplate.postForObject(CAS_URL + "/auth?st=" + st, null, String.class);
ObjectMapper mapper = new ObjectMapper();
ObjectNode result = mapper.readValue(s, ObjectNode.class);
boolean success = result.get("result").asBoolean();
if (!success) {
throw new RuntimeException("st异常");
}
String username = result.get("username").asText();
HttpSession session = request.getSession();
session.setAttribute("username", username);
return "index";
}
}
|
DEMO配置文件,application.properties
1
2
3
4
5
6
7
8
9
10
11
12
13
| server.port=8081
localServerUrl=http://server.com:${server.port}
spring.freemarker.allow-request-override=false
spring.freemarker.cache=true
spring.freemarker.check-template-location=true
spring.freemarker.charset=UTF-8
spring.freemarker.content-type=text/html
spring.freemarker.expose-request-attributes=false
spring.freemarker.expose-session-attributes=false
spring.freemarker.expose-spring-macro-helpers=false
spring.freemarker.suffix=.ftl
spring.freemarker.template-loader-path=classpath:/templates/
|
测试
为了直观,设置了hosts文件:
1
2
| 127.0.0.1 cas.com
127.0.0.1 server.com
|
启动CAS,端口:8080。
启动一个demo1,端口:8081。再启动一次demo,端口改为8082:8082
IDEA启动多次项目的设置:
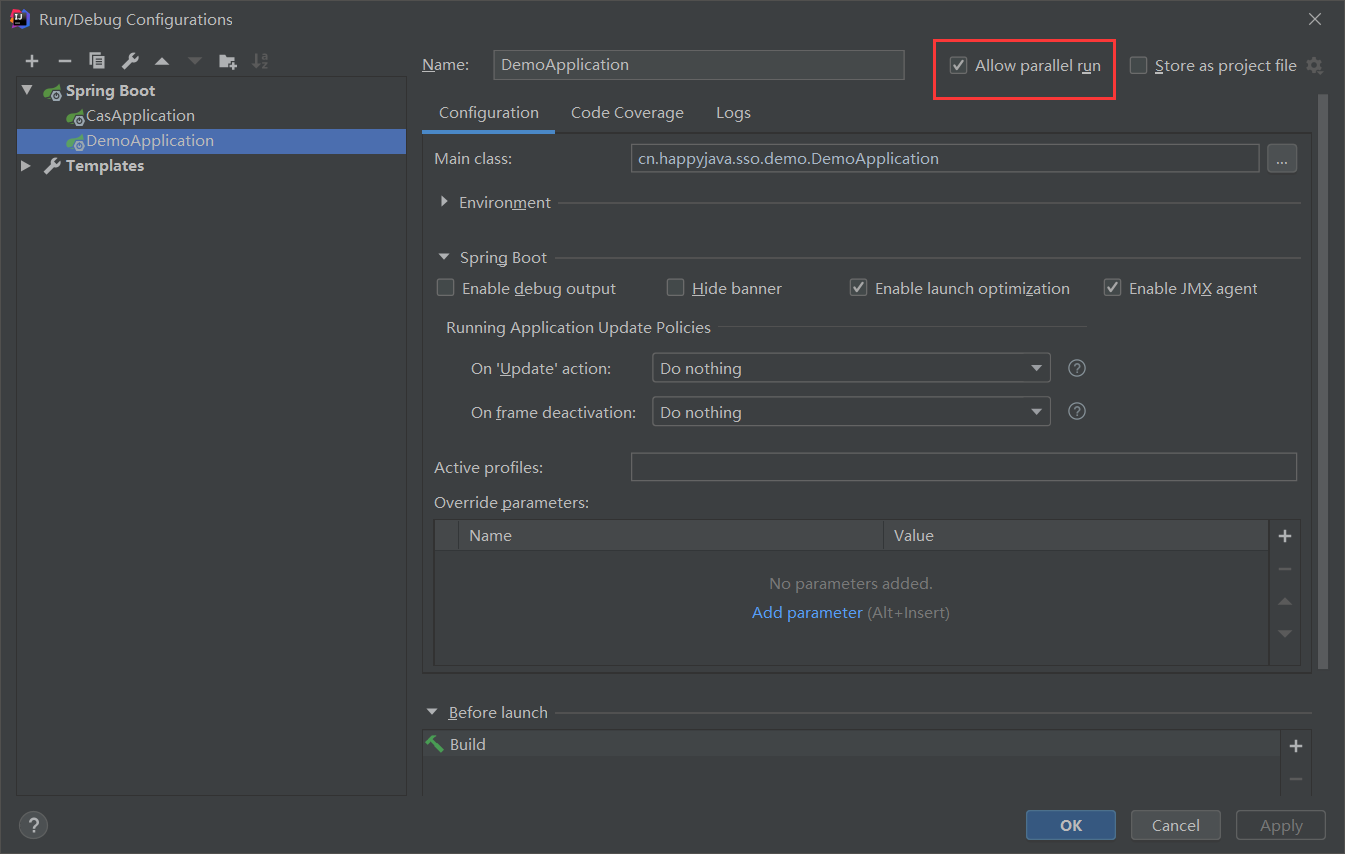
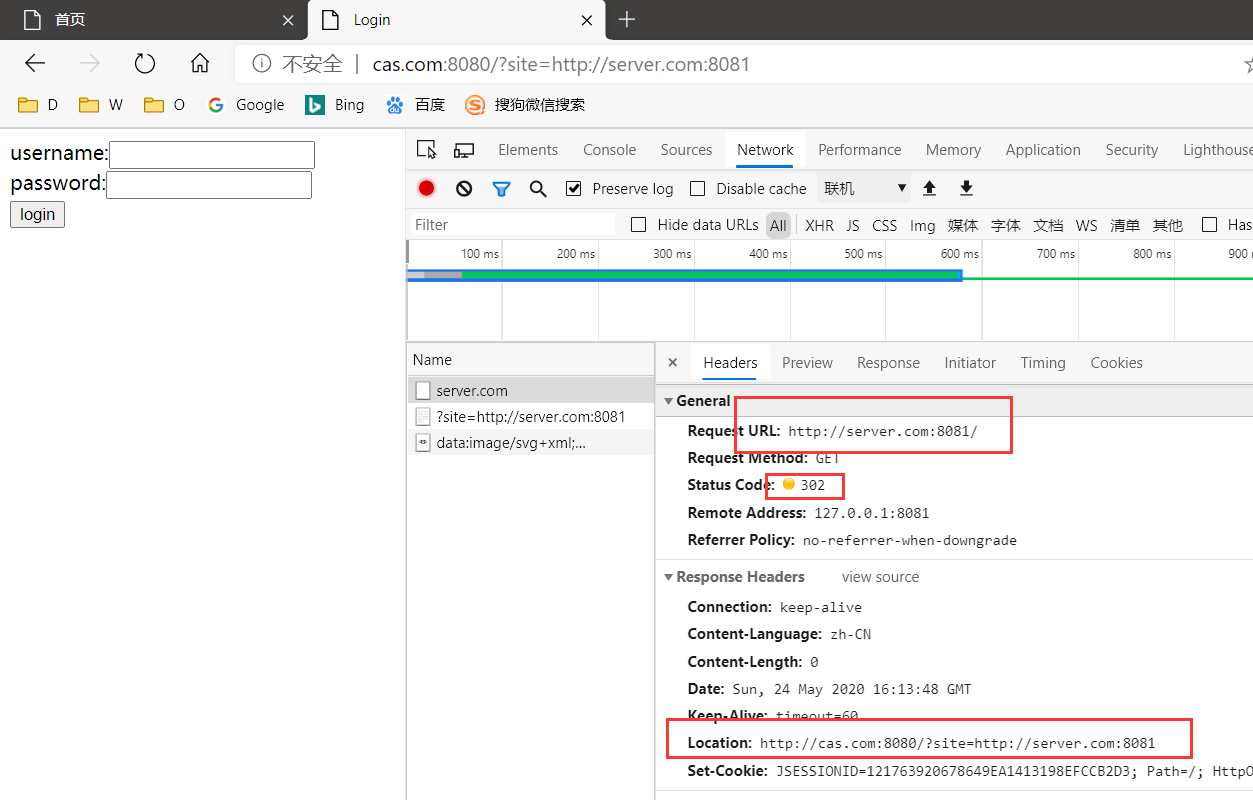
先访问:http://server.com:8081。没有登录server1,被重定向到cas系统登录页。
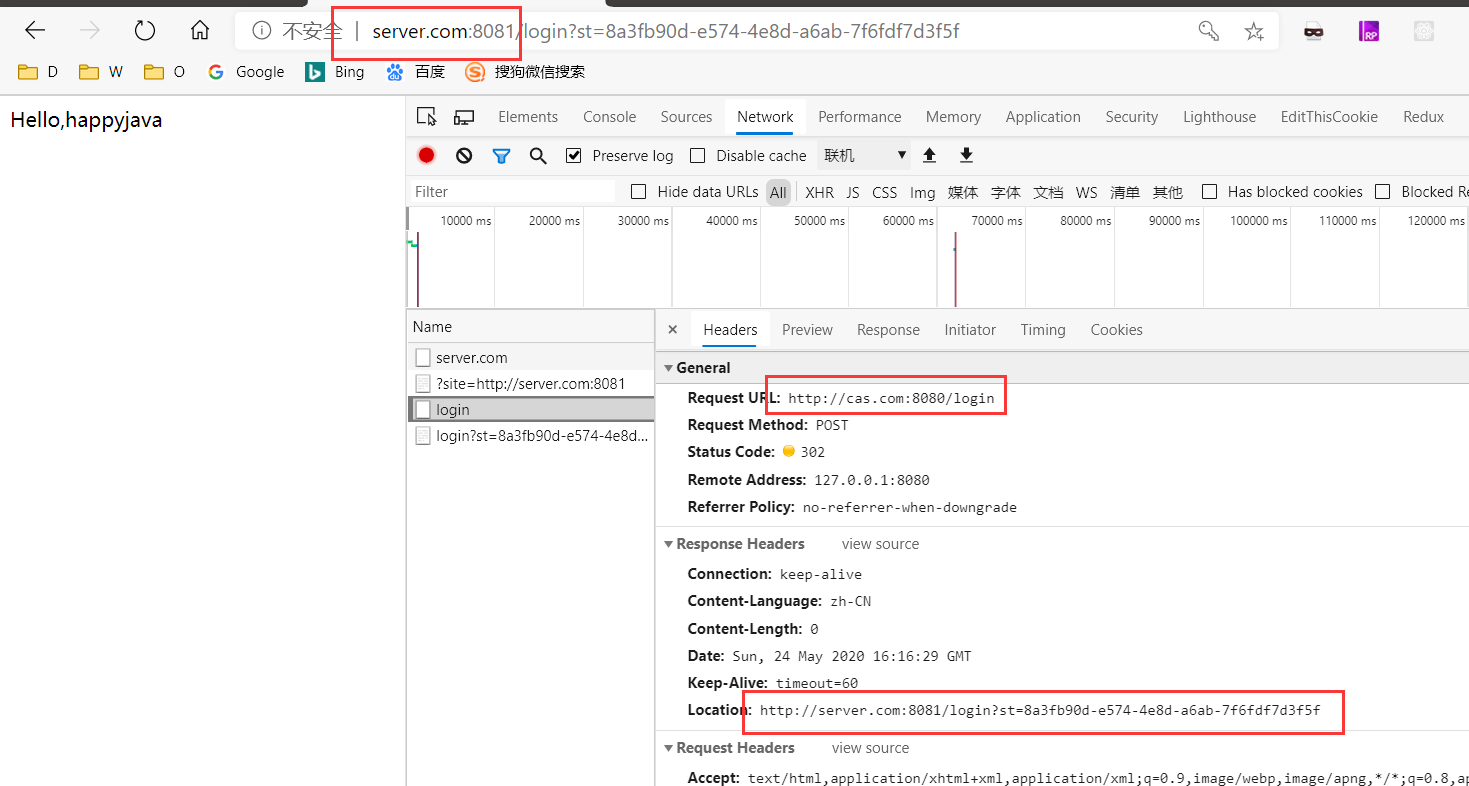
进行登录:登录成功之后会重定向回到server.com:8081系统上。此时已经完成了第一个系统的登录。
直接访问http://server.com:8082,看看会不会自动登录。

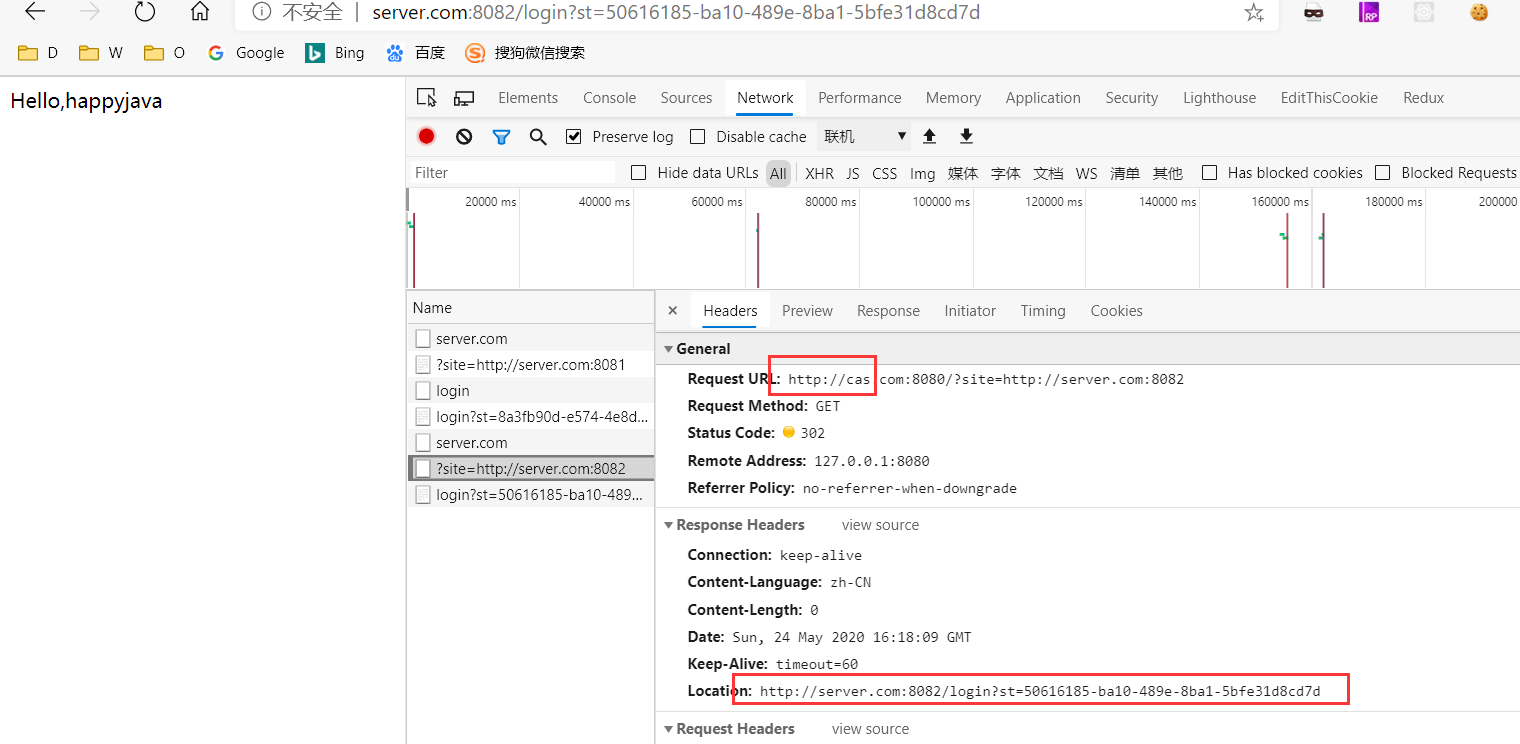
可以看到,先是重定向到cas上,然后cas又重定向回server.com:8082上自动完成登录。
源码下载
如果大家喜欢点个star吧~~~3q。源码下载地址:https://github.com/happyjava007/java-sso-cas
【Happyjava】原创,转载请注明出处!